Introduction
Having a baby is one of the best things that will happen to you in your life. It comes with a lot of beauty and innovation in your life. You should leave aside the things you have always done and develop new habits. You should reshape your life according to the baby’s sleeping, eating and education patterns. In this regard, it is very important to follow your sleep, food and toilet. The baby’s crying, sleeping, sucking, what color it is and how often it goes to the toilet all give us clues about how its development is going. As a parent, you are primarily responsible for the baby’s overall development. There are many paid and free applications for baby development tracking. But you have to enter the information into all these applications yourself.
When it became a problem for us to keep track of when we put our baby to sleep, we thought about how we could automate this. There are paid solutions for this, but they are quite expensive. For example, you can get this information with a sensor worn on the foot, such as a sock. But instead of paying for it, we started researching whether we could do something with the equipment we had.
We started by determining the equipment we could use. The cradle we use is like the one below and instead of swinging sideways, it swings up and down.
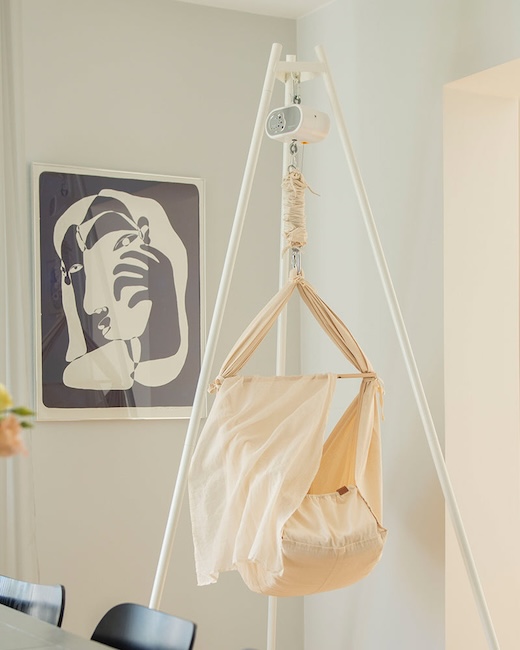
The little motor on it rocks the cradle. The truth is that this crib really made us feel very comfortable, it helps the baby sleep easily. So how to track sleep with this crib? We thought about whether we could do something with the Arduino and sensors that we had purchased before, and we decided to try it.
I started researching what could be done with the Arduino and sensors I had previously purchased. But since I had no prior experience, it was difficult to understand what was right or wrong.
Finding the right one among many options takes time. Here are the results of my research and experiments.
Motion detection with vibration sensor
The first thing that came to my mind was to track the crib with a motion sensor, based on the logic that if the crib is moving, the baby is sleeping. Accordingly, I researched all the sensors I had one by one and finally found the sensor I needed.

The sw-420 vibration sensor module, sold with almost all Arduino kits, was exactly the solution I was looking for. First, to see what I could do with the Arduino Nano I had, I downloaded and installed the Arduino Idelink 1. As a result of a short search on the Internet (which is even available in the examples in the Arduino Ide), I found a simple sample application code.
In my first attempts, the device worked as I expected. But the results sent were very inconsistent. I made arrangements for a change of situation, but it didn’t really work. While researching on the internet, I came across ESPHome, which is fully integrated with Home Assistant.
I purchased ESP8266 with an integrated Wifi modulelink 2.
I quickly developed the application via ESPHome and started tracking it. It really gave me the results I wanted at first use, but then it started to give inconsistent results. It was stuck in on or off state or continued to send incorrect messages. Even though I tried to make adjustments with the calibration setting on it, I cannot say that I was very successful. I can say that it was a complete disappointment.
If anyone is interested, they can examine the vibration.yaml file.
Output:
Pros:
- Easy to use
- Wiring diagram simple
- Easy to coding
Cons:
- Inconsistent results
- Product quality poor
- Even though there is a calibration setting, the sensitivity is not enough
- Doesn’t show real sleep status
Distance measurement with ultrasonic sensor
While examining the sensors I had, I decided that I could experiment with the Ultrasonic Sensor HC-SR04 sensor.
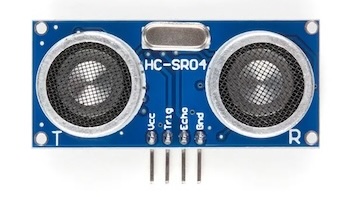
It shouldn’t be difficult to measure the distance to detect the up-down movements of the crib and use a simple logic, right?
At first everything started simple and easy, but soon errors began to appear in the measurements.
As shown in the figure, the expected distance per second is around 15cm.

At first, we had placed the device under the crib, but due to my wife’s concern, I placed it on the end of the rod, facing the floor. So he started making measurements from outside the cradle. But this time, the measuring device moved from where I placed it and started reporting that the crib was stationary. To solve this, I added a 10-minute timeout and arranged it so that if the crib stops and moves again within 10 minutes, it will only be detected as a single time period.
Here is the ESPHome integration code:
If anyone is interested, they can examine the ultrasonic.yaml file.
More flexible and useful integrations can be made using C++ within ESPHome. There is a lot of information and examples on this subject on the website.
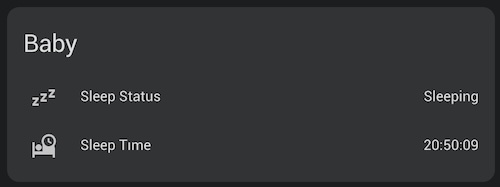
Below is the screenshot of the Home Assistant screen.
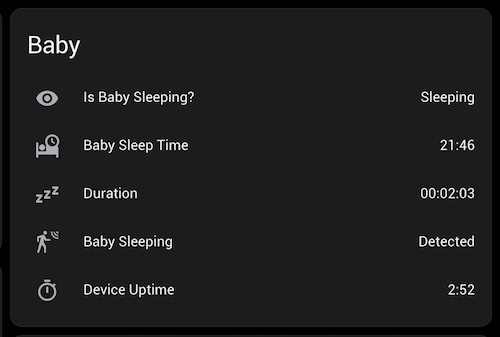
As seen in the screenshot, it can be seen when he sleeps and for how long.
But I encountered problems here too. The system started returning nan intermittently, and sometimes it just returned nan.
Even though I made some adjustments, I couldn’t get the result I wanted.
Thanks to ESPHome, I was able to seamlessly integrate with Home Assistant and instantly access debug information via the web interface.
Of course, I encountered another problem. This time the baby was not sleeping even though he was in the crib :/ But the device said it was asleep. In other words, it did not show the real situation.
Pros:
- Easy to use
- Wiring diagram simple
- Provides more realistic results
Cons:
- The code is complex
- Frequently returns invalid results
- Does not give real sleep status
Eye tracking with camera
So, can we put a camera inside the crib and follow the baby’s sleep? Tracking whether your eyes are open or closed gives much more accurate results. The other two approaches allow us to follow from the outside and give general results, but the camera approach seems to be much more effective.
While I was searching for a camera compatible with ESP8266, I came across ESP32-CAMlink 3. It is much more useful with its integrated camera and wifi module. It has WIFI, it has a camera, and it is ESP32 based, so I do not need to connect with ESP8266.
After waiting a few days, the product arrived and I immediately started making the first tests.
A complete disappointment. The image quality is bad, it is very slow and the images are dark. When I put it in the crib, I couldn’t even get a clear image. I had to return it.
But another option, and actually the most logical one, was to use a baby camera. The ieGeek Baby 1Tlink 4 baby camera that I use on a daily basis has the features I want.
- Can also be used in dark environments with night vision
- Can be placed inside the baby crib with wide-angle camera
- Thanks to Clear image, eye and face details can be captured
The only problem is accessing the camera over the network. The device has Onvif support, but I want to connect with rtsp instead of Onvif. The reason for this is because I think it will be easier to use with OpenCv.
I also bought a camera holder online to stabilize the cameralink 5.
Getting the rtsp address was a bit difficult, this information can be obtained with many paid applications on the internet. But I got this information using open source applications. There are two different rtsp addresses depending on image quality.
- rtsp://USERNAME:PASSWORD@IP_ADDRESS:8554/Streaming/Channels/101
- rtsp://USERNAME:PASSWORD@IP_ADDRESS:8554/Streaming/Channels/102
OpenCV has facial recognition, but the results were not very consistent. The best solution I could find for my needs was Google MediaPipelink 6. It can easily detect facial features with face mesh.
If anyone is interested, they can check out third method folder.
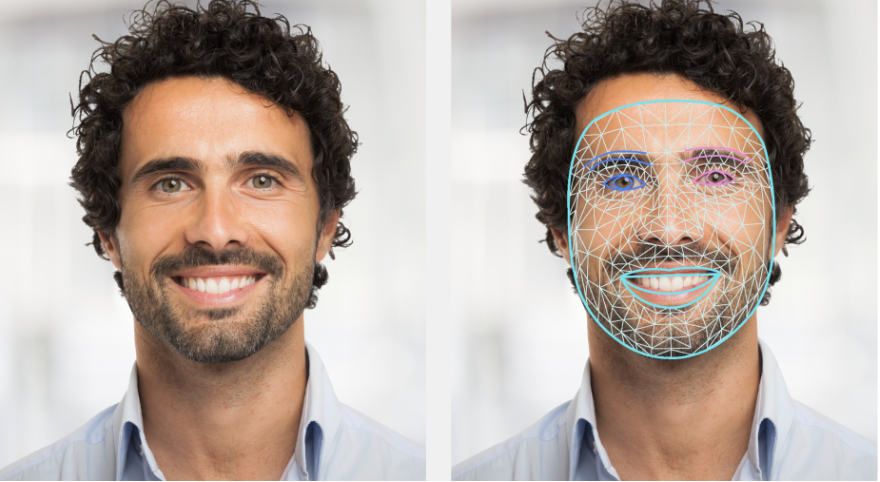
In this way, it was very easy to determine whether the eyes were open or closed. There are many sample codes available on the Internet to check the condition of the eyes. I made some edits using one of these as a reference.
The biggest problem I encountered was that the camera did not recognize faces at all when it was upside down. I found this by rotating the image 90 degrees and checking it. If the face is identified when it is rotated 90 degrees, the image is rotated first in the next scanning process.
All development and testing was done on my own laptop. The application I developed had to run either on a server or on the Home Assistant application.
I thought it would be easier to run on Home Assistant rather than installing it on a server. Applications within Home Assistant are run on Docker. This meant that my little application had to run on Docker.
I’m now tracking my baby’s sleep more accurately, but there’s just one problem left. Unfortunately, when the baby turns his face to a place that the camera cannot see, his face cannot be detected. So I ordered two cameras. I want to analyze the image from two different sources by placing them in the corners. I couldn’t try this because the cameras hadn’t arrived yet.
Pros:
- Provides real-time and consistent information
- Different data can be collected by looking at body position
Cons:
- The code is quite complex
- A server also needs to run constantly
- System requirements are high
- Distracts baby trying to sleep
- Expensive equipment required
Epilogue
I gained a lot of new information through this research and development. I learned how to communicate with Home Assistant, how to easily program Arduino devices with ESPHome, and how to track faces and movements with MediaPipe. It was also an interesting experience to test different approaches and see their pros and cons.
Among three different approaches, I decided that facial recognition was the best option for me. Despite its many cons, I currently use camera tracking. I think it would be faster if it was run on another server instead of running it on Home Assistant.
You can access the full source code of the project here.
Bonus Chapter
I developed a small script to monitor the baby’s sleep status from the iPhone home screen with the Scriptable application.
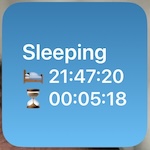
If anyone is interested, they can examine the BabySleepTracker.js file.
Note: I do not share the vibration and ultrasonic sensor connection diagrams, you can easily find them on the internet.
Links
1 https://www.arduino.cc/en/software
2 https://www.amazon.de/dp/B0754N794H?ref=ppx_yo2ov_dt_b_product_details&th=1
3 https://www.amazon.de/dp/B08X3GRK22?psc=1&ref=ppx_yo2ov_dt_b_product_details
4 https://www.amazon.de/dp/B0CDGHV276?psc=1&ref=ppx_yo2ov_dt_b_product_details
5 https://www.amazon.de/dp/B0B8ZT5HDW?psc=1&ref=ppx_yo2ov_dt_b_product_details
6 https://developers.google.com/mediapipe